Installing the New Water Heater
When considering the installation of a new water heater, it is essential to first choose the right type for your needs. Electric and gas water heaters each have their own advantages and requirements. Electric models typically require a dedicated circuit and a compatible voltage. On the other hand, gas water heaters need proper ventilation and a gas line connection. Evaluating these factors will help you determine the optimal choice for your home.
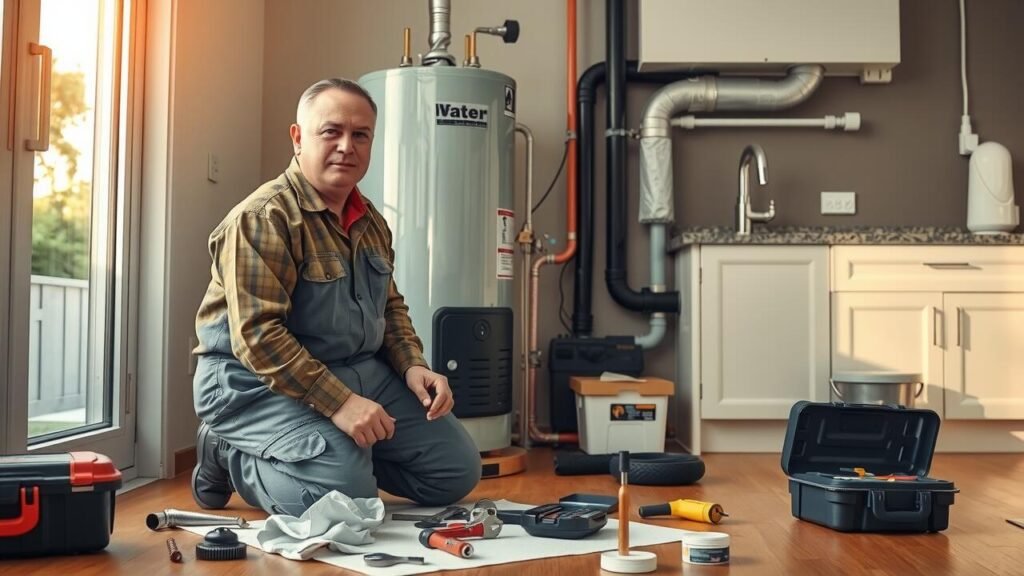
Before beginning the installation process, ensure you have all necessary tools and safety equipment. Shut off the water supply and disconnect the power source to the existing unit. Familiarize yourself with local codes and regulations, which can vary across California. If you’re unsure about handling the installation, looking for “Water Heater Repair and Replacement near me” may lead you to professional services that can assist with proper installation or troubleshooting.
Step-by-Step Installation Guide
Before starting the installation of your new water heater, ensure you have all necessary tools and materials readily available. Shut off the power supply or gas line to the old water heater. Drain the existing tank to prevent spills and make the removal process easier. Disconnect the water supply lines and the venting system if applicable. Guidelines for this step can vary based on the type of unit, so consulting the manufacturer’s instructions is always wise. For those uncertain about their skills, searching for “Water Heater Repair and Replacement near me” can provide local expertise.
Once the old unit is removed, position the new water heater in place. Securely connect the water supply lines to the inlet and outlet pipes, ensuring they are tightened properly to prevent leaks. For electric units, follow the wiring instructions carefully, connecting the supply wires to corresponding terminals. If installing a gas water heater, make sure the gas line is correctly linked and use pipe thread sealant as needed. Checking your work at each stage will save time and trouble later on, assuring everything is set up for successful operation.
Connecting to Water and Power Supply
Successfully connecting your new water heater to the water and power supply is crucial for optimal performance. Begin by ensuring that the main water supply is turned off. Use plumbing tape on the threads of the water inlet and outlet prior to making connections, as this will help prevent leaks. Connect the cold water line to the inlet marked “cold” and the hot water line to the “hot” outlet. Double-check all connections for tightness, minimizing the risk of any future leaks.
For electrical models, it is essential to follow local building codes regarding electrical work. Ensure the circuit breaker is turned off before connecting the power supply. Securely attach the power wires to the appropriate terminals in the heater. After completing the wiring, turn the circuit breaker back on and ensure that your water heater functions correctly. If any issues arise during this process, consider searching for “Water Heater Repair and Replacement near me” for professional assistance.
Ensuring Proper Hookups for Functionality
Connecting a water heater involves several critical steps that ensure functionality and safety. It is essential to tightly secure all plumbing connections to prevent leaks. For electric water heaters, check that the wiring matches the manufacturer’s specifications. The power supply should be turned off during this process to avoid any electrical hazards. Following the guidelines in the installation manual ensures compliance with local codes and standards.
After establishing the initial connections, verify that water supply lines are appropriately installed. Use pipe insulation to protect against heat loss, particularly in colder climates. Ensure that the drainage and venting systems are in place and functioning correctly to prevent backflow or carbon monoxide buildup. For those feeling uncertain about any part of this process, seeking professional advice with services like “Water Heater Repair and Replacement near me” can provide reassurance and expertise.
Testing the New Installation
After the installation is complete, it’s crucial to conduct some tests to ensure that everything is functioning properly. Begin by turning on the water supply and checking for any leaks at the connections. This step will help identify any potential issues that might compromise the integrity of the installation. Additionally, observe the drainage system to confirm it operates correctly, preventing any water buildup or blockages.
Next, power up the water heater and allow it to run for a short period. Monitor the heating process to verify that it reaches the desired temperature. It is also a good idea to check the thermostat settings and adjust them if necessary. If you notice any unusual sounds or failure to heat, it may be prudent to seek assistance. Search for “Water Heater Repair and Replacement near me” to find local professionals who can provide assistance with any problems that arise during this testing phase.
Checking for Leaks and Efficiency
Once the new water heater is installed, checking for leaks is an essential next step. Begin by thoroughly inspecting all connections, including the inlet and outlet pipes, as well as the pressure relief valve. Look for any signs of moisture or dripping, which can indicate a compromised seal or connection. If any issues arise during this inspection, addressing them promptly will prevent further damage or complications.
After leak checks, it is important to test the efficiency of the water heater. Turn on the hot water tap and allow the system to run for a few minutes. Pay attention to the water temperature and ensure it reaches the desired level quickly without any fluctuations. If you notice any inconsistencies, it may require adjustments or professional help. In such cases, searching for “Water Heater Repair and Replacement near me” could provide timely assistance to resolve any lingering issues.
FAQS
Do I need a permit to replace my water heater in California?
Yes, in California, you typically need a permit to replace your water heater. This ensures that the installation meets local building codes and safety standards.
What are the requirements for installing a water heater in California?
Requirements may vary by city, but generally, you need to comply with local building codes, ensure proper venting and drainage, and follow manufacturer guidelines. It’s advisable to check with your local building department for specific regulations.
Can I install a gas water heater myself in California?
Yes, you can install a gas water heater yourself, but it is highly recommended to hire a licensed professional due to the complexities and safety concerns associated with gas installations, including venting and gas line connections.
How can I ensure my new water heater is energy-efficient?
To ensure your new water heater is energy-efficient, choose a model with a high Energy Factor (EF) rating, insulate your hot water pipes, and set the thermostat to a moderate temperature. Regular maintenance also helps maintain efficiency.
What should I do if I encounter leaks after installing my water heater?
If you encounter leaks after installation, immediately turn off the water supply and check all connections. Tighten any loose fittings and replace any damaged components. If the issue persists, it may be best to consult a professional plumber.